|
1.0 Editing the EEPROM
configuration |
|
1.1 |
From the command line or Terminal
window start by running the following command : |
|
pi@raspberrypi ~
$
sudo rpi-eeprom-config -e |
| |
Change the setting of
POWER_OFF_ON_HALT
from
0
to
1
,
Add
PSU_MAX_CURRENT=5000 at the
end of the file that reads like this:
|
|
 |
|
1.2 |
Reboot your
Raspberry Pi 5 to make the change take effect. |
| |
pi@raspberrypi ~
$
sudo
reboot |
| |
|
2.0 Configuring the Raspberry
Pi for I2C |
|
2.1 |
From the command line or Terminal
window start by running the following command : |
| |
pi@raspberrypi ~
$
sudo raspi-config |
| |
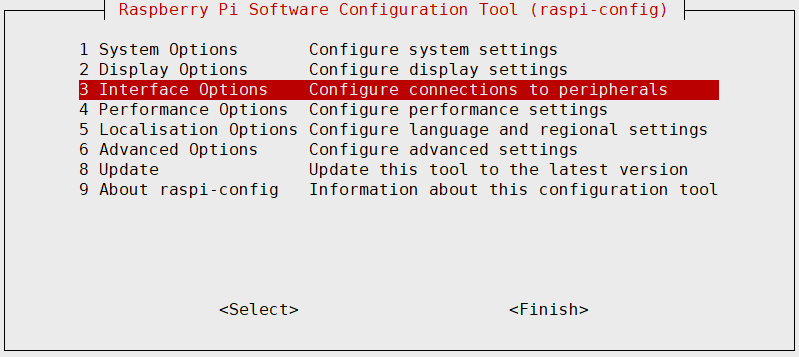
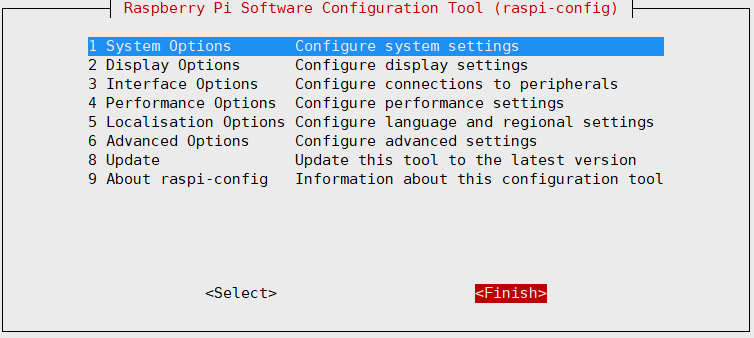
This will launch the raspi-config
utility. Select "Interfacing Options" |
| |
 |
| |
|
|
2.2 |
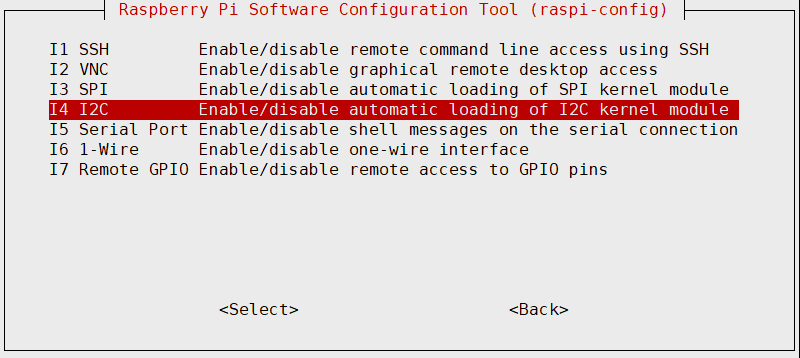
Highlight the “I2C” option and
activate "<Select>" |
| |
 |
| |
|
|
2.3 |
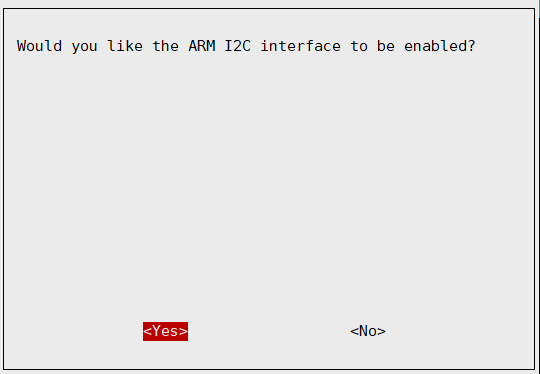
Select and activate “<Yes>”
|
| |
 |
| |
|
|
2.4 |
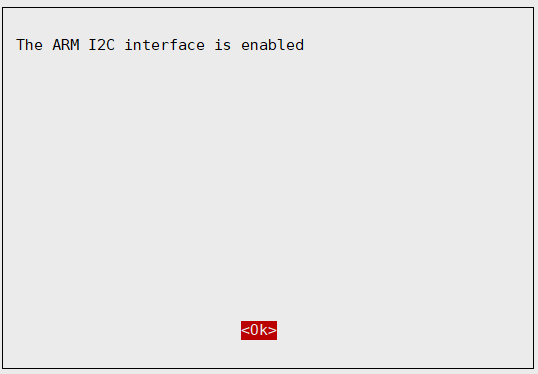
Highlight and activate “<Ok>”
|
| |
 |
| |
|
|
2.5 |
Activate
"<Finish>", this will exist the raspi-config utility. |
| |
 |
| |
|
|
2.6 |
Update your Pi and
Install the required
dependencies |
| |
pi@raspberrypi ~
$
sudo
apt-get update |
| |
pi@raspberrypi ~
$
sudo
apt-get upgrade -y |
| |
pi@raspberrypi ~
$
sudo
apt-get install python3-pip |
| |
|
|
2.7 |
Download the
required scripts |
| |
pi@raspberrypi ~
$
git
clone https://github.com/suptronics/x120x.git |
| |
|
|
2.8 |
Reboot the
Raspberry Pi |
| |
pi@raspberrypi ~
$
sudo
reboot |
| |
The Raspberry Pi
will reboot and the interface will be enabled. |
| |
|
|
2.9 |
Once you have logged into your Raspberry Pi from the command
line, run the command to see all the connected devices
|
| |
pi@raspberrypi ~
$
sudo
i2cdetect -y 1 |
| |
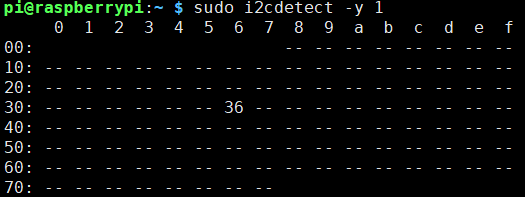
#36 - the address of the battery fuel
gauging chip |
| |
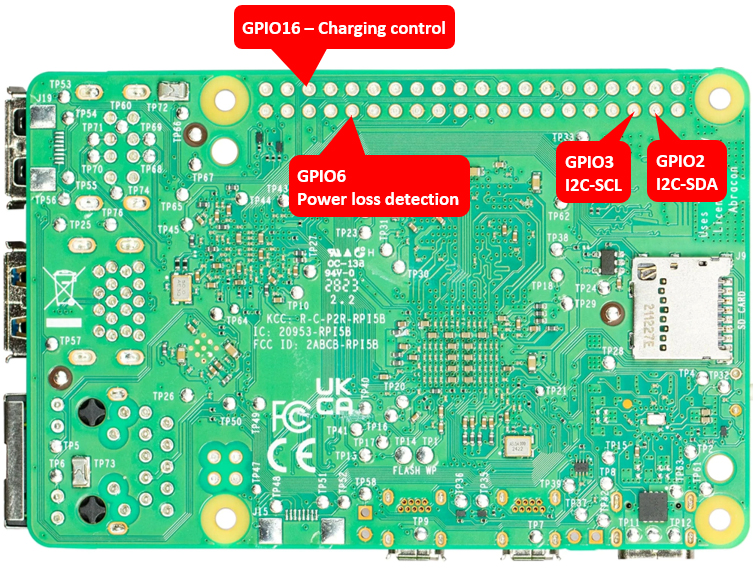
*The UPS connects to the Pi GPIO via
pogo pins, If the I2C address (0x36) is not detected, Please
clear the leads of pin 3 and pin 5 on the GPIO header from
the bottom of the Raspberry Pi PCB and install again.
|
| |
 |
| |
|
|
3.0 Reading UPS status |
| |
Command line for reading UPS status |
| |
For
Debian12 (bookworm), Kernel version 6.6 |
| |
pi@raspberrypi:~/x120x
$
sudo python3 merged.py |
| |
 |
| |
|
| |
For
Debian13 (trixie), Kernel version 6.12 |
| |
pi@raspberrypi:~/x120x
$
sudo python3 merged-trixie.py |
| |
 |
| |
|
| |
|
| |
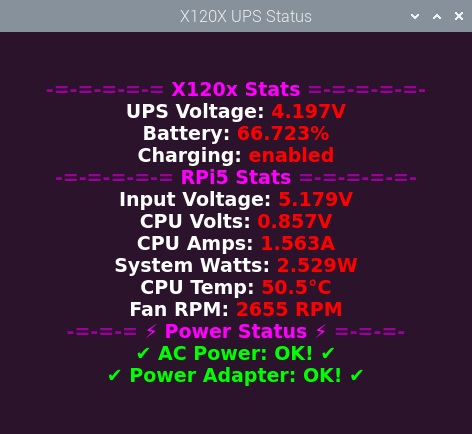
Desktop interface
for reading UPS status |
| |
pi@raspberrypi:~/x120x
$
sudo python3 qtx120x.py |
| |
|
| |
 |
| |
|
|
4.0 Manual reading battery voltage
& percentage |
|
4.1 |
Run the command to
read battery voltage and percentage |
| |
pi@raspberrypi:~/x120x
$
sudo python3
bat.py |
| |
|
|
4.2 |
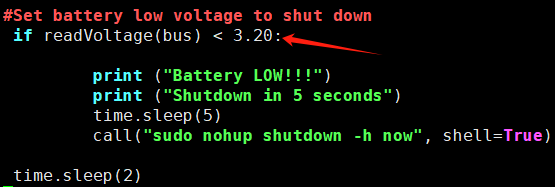
Change the battery
low voltage to implement safe shutdown. default is less than
3.20Vdc. |
| |
pi@raspberrypi:~/x120x
$
sudo nano
bat.py |
| |
 |
| |
Note: the voltage
range must be 3.00~4.10vdc. |
| |
|
|
4.3 |
Save and exit. In
nano, you do that by hitting CTRL + X, answering Y and
hitting Enter when prompted. |
|
|
|
|
5.0 Manua testing AC Power loss or power
adapter failure detection (PLD) |
|
5.1 |
Execute the
command to initiate power loss detection (PLD) |
| |
For
Debian12 (bookworm), Kernel version 6.6 |
| |
pi@raspberrypi:~/x120x
$
sudo python3 pld.py |
| |
|
| |
For
Debian13 (trixie), Kernel version 6.12 |
| |
pi@raspberrypi:~/x120x
$
sudo python3 pld-trixie.py |
| |
|
| |
Disconnect the
power adapter and observe the detection of the power loss. |
|
|
|
6.0
Control battery charging
-
for
advanced users
only |
|
6.1 |
To disable battery charging |
| |
pi@raspberrypi ~
$
pinctrl set 16 op dh |
| |
|
|
6.2 |
To enable battery charging |
| |
pi@raspberrypi ~
$
pinctrl set 16 op dl |
| |
|

