Home     Products     Web Store       Product Customization       OEM/ODM     Contact  
     
    Function Description        X710            


Power Jack, power input and power output
4-Pin Function Header
  Power input range  6~36Vdc , ≥ 2A
  DC Power Plug Size  5.5*2.5mm
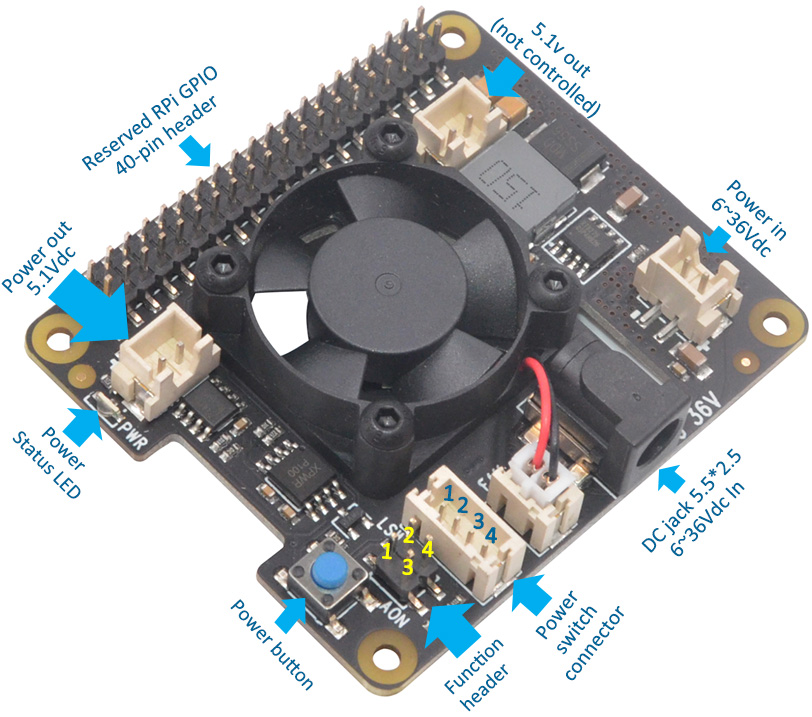
Power input / output connector  XH2.54mm 2pin


1. X710 powers the Raspberry Pi via the 40-pin header (Pin 2 & 4)
2. Don't power the Raspberry Pi via the Micro USB or Type-C socket
3. XH2.54 power input connector connects to DC power jack directly.

4. Don't connect any 5V-powered device to XH2.54 power input

   connector.
5. X710 can be powered via the onboard DC jack or XH2.54 power

   input connector.

Pin Number Usage
Pin 1 and Pin 3
(AON)
 Short - Auto power-on when power applied
 Open - Power on when power button pressed 
Pin 2 and Pin 4
(L-SW)
 Short - Using external latching switch 
 Open - Using on-board power button or external
             external momentary switch


1. Power adapter must be disconnected when selecting momentary
    button or latching switch.
2. Full poweroff from software is not supported when using  external
    latching power switch


Connectors for External Power Switch
Using momentary power button
Pin No. Pin Description
1  Power on/off control connecting to momentary switch
2  Power on/off control connecting to latching switch
3  Ground
4  LED+ for power on, rebooting and shutdown

1. Pin2 not connected when using momentary switch.
2. Pin1 not connected when using latching switch.
3.
PH2.0 connector - Pitch 2.0mm 4pos
Press and Release  Raspberry Pi and X710 turn on
 Power LED stays on
Press and hold for 1~2 seconds  System rebooting 
 Power LED Blinks rapidly
Press and hold for 3~7 seconds  System shutting down 
 Power LED Blinks slowly
Press and hold for >8 seconds  Force shutdown

*S
cript for power control installed
 
 
Using  external latching power switch
Pins and GPIO used
Switch pressed  Raspberry Pi and X735 turning on
 The PWR LED stays on
Switch released
(Script for power
 control installed)
 System shutting down and the PWR LED
 blinking slowly
Switch released
(Script for power
control not installed)
 The PWR LED stays on and will force
 shutdown after 8 seconds

The function header's Pin2 and Pin4 should be short when using an external latching power switch.
Pin No. Usage
2, 4  +5V power supply
6  Ground 
29  GPIO5 for power management
32  GPIO12 for power management 
33  GPIO13 for power management


    Board Assembly
     
 
Push a screws (M2.5*5mm) up through the mounting hole on the underside of the Raspberry Pi.
 
Screw the spacer (M2.5*12mm) down until it is hand tight
 
     
Plugs the X710 board straight into your Raspberry Pi B+'s GPIO header and screw down (M2.5*5mm)


  © 2018 SUPTRONICS TECHNOLOGIES LIMITED, ALL RIGHTS RESEVERED