|
(1) Configuring the Raspberry
Pi for I2C |
|
(1.1) |
From the command line or Terminal
window start by running the following command : |
| |
pi@raspberrypi ~
$
sudo raspi-config |
| |
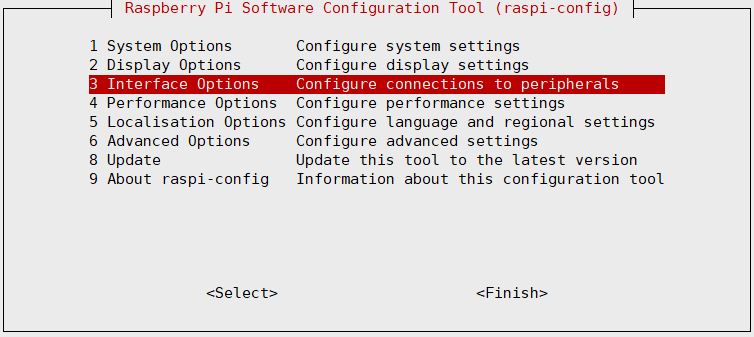
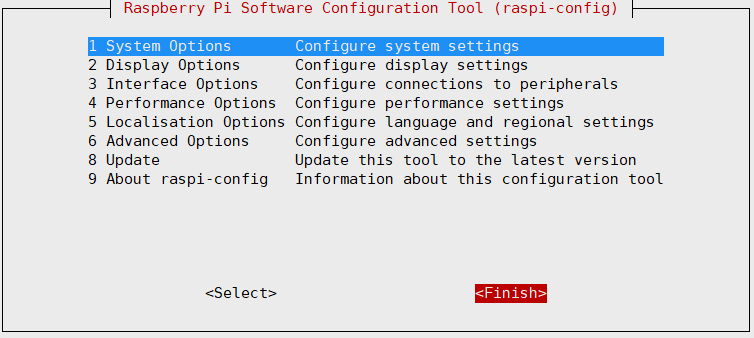
This will launch the raspi-config
utility. Select "Interfacing Options" |
| |
 |
| |
|
|
(1.2) |
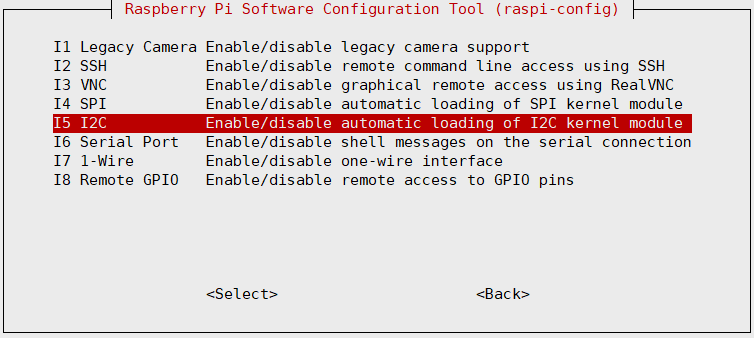
Highlight the “I2C” option and
activate "<Select>" |
| |
 |
| |
|
|
(1.3) |
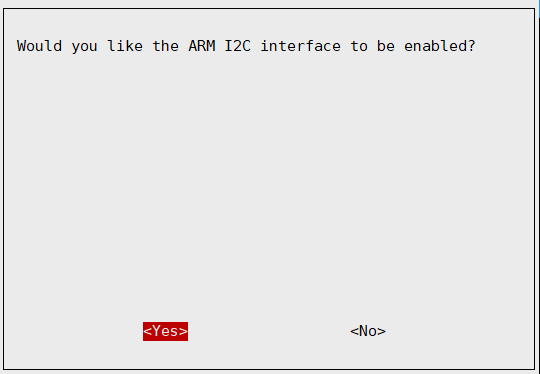
Select and activate “<Yes>”
|
| |
 |
| |
|
|
(1.4) |
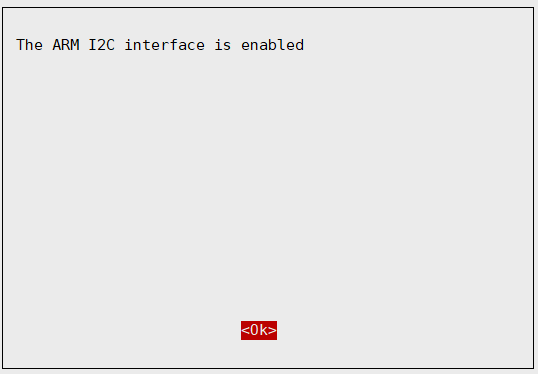
Highlight and activate “<Ok>” |
| |
 |
| |
|
|
(1.5) |
Activate "<Finish>", this will exist the raspi-config
utility. |
| |
 |
| |
|
|
(1.6) |
Run the commands to install the i2c-tools utility |
| |
pi@raspberrypi ~
$
sudo
apt-get update
|
| |
pi@raspberrypi ~
$ sudo
apt-get install -y python-smbus i2c-tools |
| |
|
|
(1.7) |
Reboot
the Raspberry Pi |
| |
pi@raspberrypi ~
$
sudo reboot |
| |
The Raspberry Pi will reboot and the interface will be
enabled. |
| |
|
|
(1.8) |
Once you have logged into your Raspberry Pi from the command
line, run the command to see all the connected devices
|
| |
pi@raspberrypi ~
$
sudo i2cdetect -y 1 |
| |
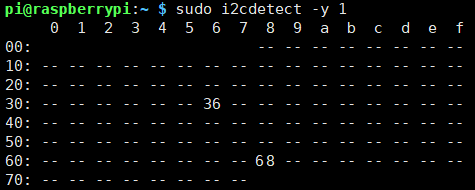
#36 - the address of the battery fuel
gauging chip
#68 - the address of the RTC chip |
| |
|
|
(2) Setting up the
power management |
|
(2.1) |
Download the required script
for power management |
| |
pi@raspberrypi ~
$
wget
https://raw.githubusercontent.com/suptronics/x728v2.2/main/pwr.sh |
| |
|
|
(2.2) |
Install the script for power
management |
| |
pi@raspberrypi ~
$
sudo bash pwr.sh |
| |
|
|
(2.3) |
Setting up the command to turn
off X728 from software |
| |
pi@raspberrypi ~
$
printf "%s\n" "alias x728off='sudo
x728softsd.sh'" >> ~/.bashrc |
| |
|
|
(2.4) |
Reboot
the Raspberry Pi |
| |
pi@raspberrypi ~
$
sudo reboot |
| |
|
|
(2.5) |
Powering off the
Raspberry Pi from software |
| |
pi@raspberrypi ~
$
x728off |
| |
|
|
(3) Reading battery
voltage & percentage |
|
(3.1) |
Download the script
for reading battery voltage and percentage |
| |
pi@raspberrypi ~
$
wget
https://raw.githubusercontent.com/suptronics/x728v2.2/main/bat.py |
| |
|
|
(3.2) |
Run the command to
read battery voltage and precentage |
| |
pi@raspberrypi ~
$
sudo python
bat.py |
| |
|
|
(3.3) |
Change the battery
low voltage to implement safe shutdown. default is less than
3.00Vdc. |
| |
pi@raspberrypi ~
$
sudo nano
bat.py |
| |
 |
| |
Note: the voltage
range must be 2.5~4.1vdc. |
| |
|
|
(3.4) |
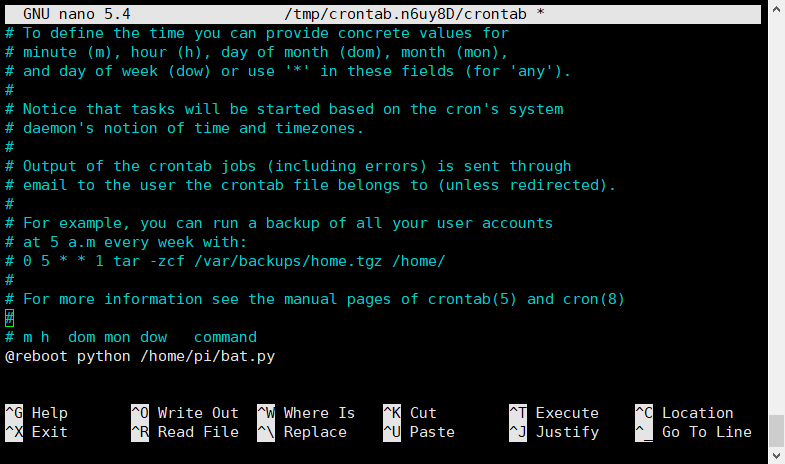
Optional
- if you want to run Python Script automatically on Bootup then run
the command |
| |
pi@raspberrypi ~
$
sudo crontab -e |
| |
|
| |
Choose "1" then press Enter |
| |
|
|
(3.5) |
Add a
line at the end of the file that reads like this: |
| |
@reboot
python /home/pi/bat.py |
|
 |
| |
|
|
(3.6) |
Save and exit. In nano, you do
that by hitting CTRL + X, answering Y and hitting Enter when
prompted. |
|
|
|
(4) AC Power loss OR
power adapter failure detection (PLD) |
|
(4.1) |
Download the
python script for power loss detection (PLD) |
| |
pi@raspberrypi ~
$
wget
https://raw.githubusercontent.com/suptronics/x728v2.2/main/pld.py |
|
|
|
(4.2) |
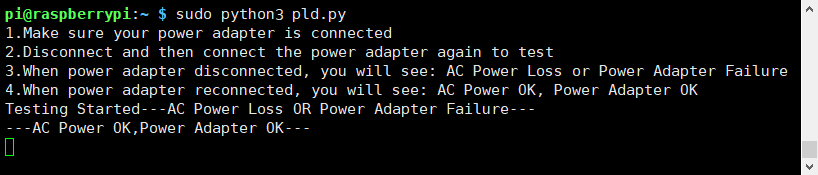
Run the script
test the PLD function |
| |
pi@raspberrypi ~
$
sudo
python pld.py |
| |
 |
| |
|
| |
Test Auto shutdown when AC power loss or power adapter
failure |
|
(4.3) |
Download the python script |
| |
pi@raspberrypi ~
$
wget
https://raw.githubusercontent.com/suptronics/x728v2.2/main/plsd.py |
| |
|
|
(4.4) |
Run the script and
then remove your power adapter |
| |
pi@raspberrypi ~
$
sudo
python plsd.py |
| |
Safe shutdown will be implemented in 5 seconds. |
| |
|
| |
Test the buzzer alarm when AC power loss or power adapter
failure |
|
(4.5) |
Download the python script for buzzer
alarm |
| |
pi@raspberrypi ~
$
wget
https://raw.githubusercontent.com/suptronics/x728v2.2/main/buzzer.py |
| |
|
|
(4.6) |
Run the script and
unplug your power adapter from the UPS. |
| |
pi@raspberrypi ~
$
sudo
python buzzer.py |
| |
Once power adapter is removed then the buzzer will generate
a beep sound continuously. |
| |
|
|
(5) Setting up the Raspberry Pi RTC Time
|
|
(5.1) |
Run the following command on your Raspberry PI to begin
editing the /boot/config.txt file. |
| |
pi@raspberrypi ~
$
sudo nano /boot/config.txt |
| |
|
| |
add one of the following lines to the
bottom of the file, |
| |
dtoverlay=i2c-rtc,ds1307 |
| |
 |
|
(5.2) |
Save and exit. In nano, you do
that by hitting CTRL + X, answering Y and hitting Enter when
prompted. |
| |
|
|
(5.3) |
Run the commands to disable the "fake
hwclock" which interferes with the 'real' hwclock |
| |
pi@raspberrypi ~
$
sudo apt-get -y remove fake-hwclock |
| |
pi@raspberrypi ~
$
sudo update-rc.d -f fake-hwclock remove |
| |
pi@raspberrypi ~
$
sudo systemctl disable fake-hwclock |
| |
 |
| |
|
|
(5.4) |
Run the command and comment out these
five lines: |
| |
pi@raspberrypi ~
$
sudo nano /lib/udev/hwclock-set |
| |
 |
| |
|
|
(5.5) |
Reboot
the Raspberry Pi |
| |
pi@raspberrypi ~
$
sudo reboot |
|
|
|
|
(5.6) |
Run the command to verify the time is
correct. Plug in Ethernet or WiFi to let the Pi sync the
right time from the Internet |
| |
pi@raspberrypi ~
$
date |
| |
|
|
(5.7) |
Run the command to write the time |
| |
pi@raspberrypi ~
$
sudo hwclock -w |
| |
|
|
(5.8) |
Run the command to read the time |
| |
pi@raspberrypi ~
$
sudo hwclock -r |
| |
|
| |
Once the time is set, make sure the
batteries are inserted so that the time is saved. You only
have to set the time once. That's it! Next time you boot the
time will automatically be synced from the X728. |