UPS+NVMe HAT - X1208
  Getting Started - hardware
   
 
  Home       Be Our Distributor      Custom Products      OEM/ODM      What We Do      Contact  
     
 
       hardware overview   hardware   software  


       Hardware description  
   
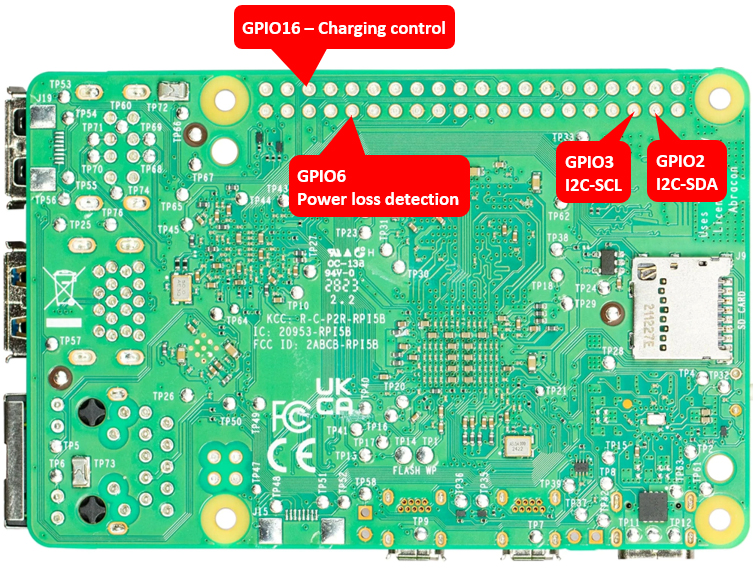
  1 Raspberry Pi GPIO used  
     
PIN# GPIO Functions
3 GPIO2   I2C-SDA, battery fuel-gauge systems -reading battery voltage and percentage
5 GPIO3   I2C-SCL, battery fuel-gauge systems -reading battery voltage and percentage
31 GPIO6   AC power loss & power adapter failture detection, Low-power supply failed, High-power supply OK
36 GPIO16   Control battery charging, High-charging disabled, Low-charging enabled 


*The UPS connects to the Pi GPIO via pogo pins, If the I2C address (0x36) is not detected or failed to read AC power state or failed to control charging, please ensure to clear the leads of the pins used on the GPIO header from the bottom of the Raspberry Pi PCB and then reinstall it.


  2 Battery voltage level indicators  
     
Battery voltage range (V) D1 D2 D3 D4 Remark
3.87-4.2 ON ON ON ON discharging levels of 100%
3.7-3.87 ON ON ON OFF discharging levels of 75%
3.55-3.7 ON ON OFF OFF discharging levels of 50%
3.4-3.55 ON OFF OFF OFF discharging levels of 25%
Below 3.4 OFF OFF OFF OFF low battery
 
       required hardware  
 
   1   

X1208 UPS HAT


Raspberry Pi 5 /4B /3B+ /3B

 
  3   Power Supply USB-C 5V 5A   4   micro-SD card (≥16GB) x1  
  5   21700 4.2V rechargeable lithium-ion battery  x1          


* For reliable operation, please use a power adapter that meets the required specification: 5V at 5A via the USB-C port. An insufficient power supply will prevent the system from powering on and may fail to charge the battery.


       hardware installation  
 
 
Step 1
   
 
  • Insert the M2.5×5mm screw upward through the base mounting hole, then thread the M2.5×13.5mm female-female spacer onto the screw until finger-tight. 

   
Step 2
   
  • Confirm the FFC cable orientation

 “PIP” – Must connect to the X1208

 “PI5” – Must connect to the Pi5

 
  • Pull out the actuator then plug the FFC cable and push the actuator to hold the cable inside.


Step 3
   
 
  • Position the pogo pin into the designated location on the PCB.

 
  • Insert the lead into the through hole, ensuring it is straight and properly seated.


Step 4
 
  • Plugs the UPS HAT directly into the Pi's 40-pin GPIO header.

 
  • Pass the FPC through the PCB slot.
 
  • Open the FPC actuator completely, and insert it in the interior of the insertion entrance surely when you insert FFC.


Step 5
   
  • Make slight adjustments to the pogo pin to align it with the through hole and ensure insertion.


Step 6
   
 
  • Secure the UPS HAT to the spacers with four M2.5x5mm screws.


Step 7
 
 
  • Insert M.2 SSD into M.2 slot then slide the SSD drive into the M.2 slot at 30 degrees while pushing it gently till it fits into the slot.

 
  • Press the M.2 SSD drive till it sits on the riser screw then lock it in place using the M2 mounting screw.


Step 8
 
  • Compatible with unprotected 21700 batteries only (Max. length: 70.3 mm).

 
  • Double-check the polarity of the battery's connector to ensure that "+" is connected to "+" and "-" is connected to "-".

 
  • Polarity also printed on the PCB* - Never make a wrong polarity connection.


© 2025 SupTronics Technologies Limited, All Rights Reserved.