|
|
|
|
|
|
PiKVM is a Free and Open
Source Software that is released under the GPLv3 license. The
Operating System (OS) image provided here is solely for the purpose
of hardware testing. For commercial use, it is advised to directly
contact the developers of PiKVM.
The development of this software would not be possible without the
financial backing of the community. Contributions play a vital role
in sustaining and advancing the project. If you wish to contribute,
you can visit the PiKVM donation page at
https://pikvm.org/donate/.
Your support is greatly appreciated and will help in the continuous
development and improvement of this software.
|
|
|
|

*Compatible with PiKVM V3 platform OS version
only, not support V4
*Not support Mass Storage Emulation as the integrated USB hub
supports data sharing between 4 target hosts and can also be used
for one of them, which will be available even in BIOS/UEFI when you
need a live disk to revive the OS or even reinstall it. |
|
|
|
|
|
| |
| |
How to install Raspberry
Pi Imager
Raspberry Pi Imager is free to install from
the official Raspberry Pi website. It's available
for MacOS, Windows, and Ubuntu systems.
1. Visit the
Raspberry Pi download page.
2. Download the
Raspberry Pi Imager installer for your Operating
System.
3. Run the
installer and follow the prompts to complete the
setup.
Write a Raspberry Pi Imager built-in image

1. Launch
Raspberry Pi Imager.
2. Click Choose OS.
3. Select Use custom to write an
unlisted image.
4. Click Choose SD card.
5. Select from the list the SD card you want to
write to.
6. Click Write to begin the image
writing process.
When the imager is finished,
you can connect your microSD card to the Pi and boot
it up.
Raspberry Pi Imager alternatives
If for whatever reason you
don't want to or are unable to use Raspberry Pi
Imager, you can opt to use an alternative
application. Here are a couple we've relied on over
the years leading up to the new imager release.
-
balenaEtcher - The application
runs on Windows, MacOS, and Ubuntu operating
systems.
- Win32
Disk Imager - This imaging software is
designed for Windows machines.
|
|
|
| |
| |
Programming the
Compute Module |
|
|
| |
| |
To program the Compute Module
with eMMC, an external “host” PC is
connected to the compoute module USB Type-B port on
the rear panel. After connecting the USB cable and
running the “rpiboot”
utility, the Compute Module 4 will then appear as a
USB device to the “host” PC, allowing it to be
programmed.
|
|
| |
Host USB Connection
for eMMC Programming |
|
|
|
|
| |
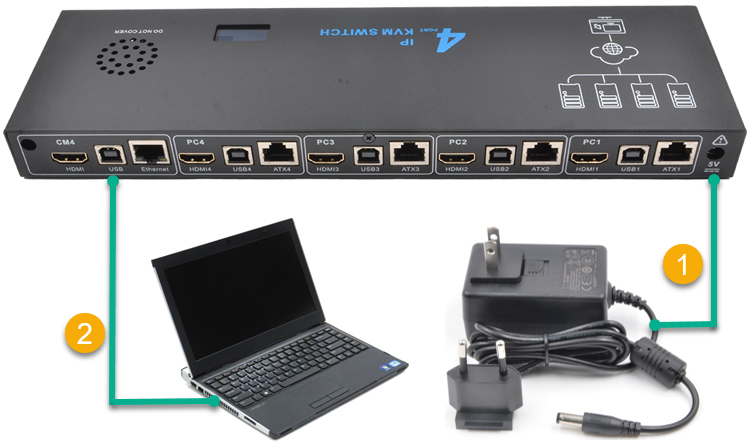
1 |
|
Connect the power
supply (5V 4A)
|
|
2 |
|
Locat a USB port on your
PC/laptop and connect using an USB2.0 A to B cable
|
|
| |
|
|
|
|
|
|
| |
3 |
|
Important:
Remove the USB cable after programming is complete.
|
|
|
|
|
| |
|
|
|
|
|
|
|
| |
| |
Configuring the OS
(Linux pikvm 6.12.56-1-rpi) |
|
|
| |
| |
1. Access to web interface
Access to PiKVM Web Interface via any
browser with the URL
https://pikvm/ OR
https:// IP address
of your ipkvm/ .
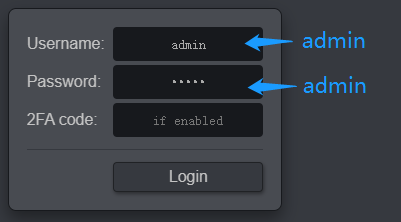
2.
Log in to PiKVM and click Terminal
:
3. Get root access (enter the root
password: root ).
|
[kvmd-webterm@pikvm
~]$
su |
|
4. To enable write-mode
|
[kvmd-webterm@pikvm
~]$
rw |
|
5. To support max resolution 1920x1080 60Hz
|
[root@pikvm
kvmd-webterm]#
nano /boot/config.txt |
|
Change the line7 from dtoverlay=tc358743
to dtoverlay=tc358743,4lane=1
Change the line10 from
dtparam=act_led_gpio=13 to dtparam=act_led_gpio=STATUS_LED_G_CLK
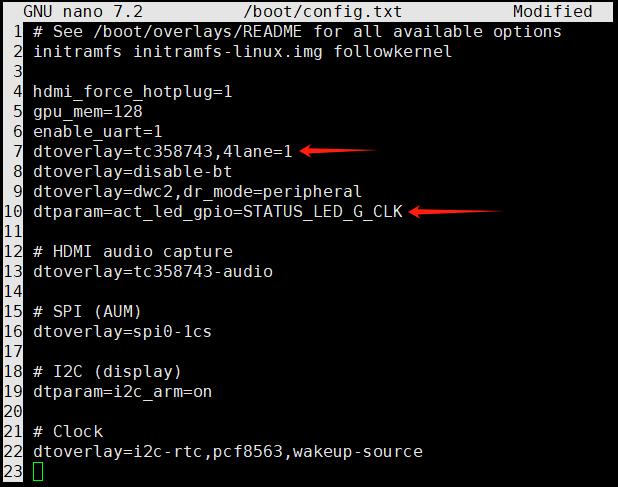
6. Save and exit by hitting CTRL + X, answering Y and hitting Enter when
prompted.
7. Editing the EDID
|
[root@pikvm
kvmd-webterm]#
chmod 777 /etc/kvmd/tc358743-edid.hex
[root@pikvm
kvmd-webterm]#
nano /etc/kvmd/tc358743-edid.hex
|
|
Delete existing EDID data, then copy and paste below
new EDID data
00FFFFFFFFFFFF005262888800888888
1C150103800000780AEE91A3544C9926
0F505400000001010101010101010101
010101010101011D007251D01E206E28
5500C48E2100001E8C0AD08A20E02D10
103E9600138E2100001E000000FC0054
6F73686962612D4832430A20000000FD
003B3D0F2E0F1E0A202020202020014F
020323454F041303021211012021A23C
3D3E1F102309070766030C00300080E3
007F8C8C0AD08A20E02D10103E9600C4
8E210000188C0AD08A20E02D10103E96
00138E210000188C0AA01451F0160026
7C4300138E2100009800000000000000
00000000000000000000000000000000
00000000000000000000000000000087 |
|
8. Save and exit by hitting CTRL + X, answering Y and hitting Enter when
prompted.
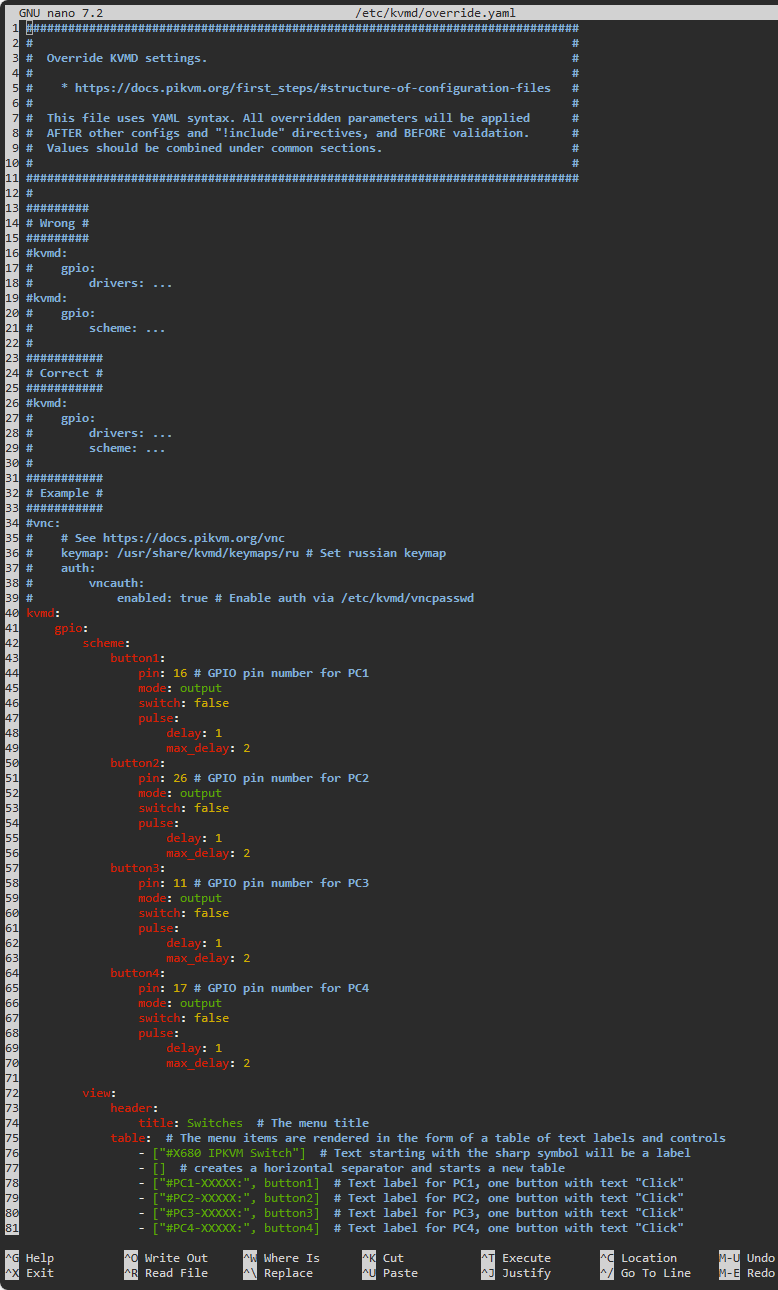
9. Adding UI elements to
control the KVM switch
|
[root@pikvm
kvmd-webterm]#
nano /etc/kvmd/override.yaml |
|
Edit the file: /etc/kvmd/override.yaml and include
the following.
kvmd:
gpio:
scheme:
button1:
pin: 16 # GPIO pin number for PC1
mode: output
switch: false
pulse:
delay: 1
max_delay: 2
button2:
pin: 26 # GPIO pin number for PC2
mode: output
switch: false
pulse:
delay: 1
max_delay: 2
button3:
pin: 11 # GPIO pin number for PC3
mode: output
switch: false
pulse:
delay: 1
max_delay: 2
button4:
pin: 17 # GPIO pin number for PC4
mode: output
switch: false
pulse:
delay: 1
max_delay: 2
view:
header:
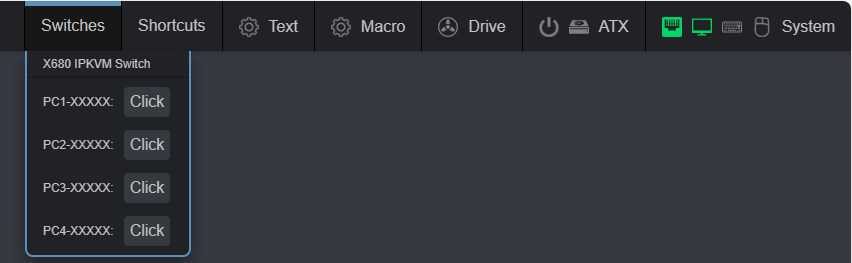
title: Switches # The menu title
table: # The menu items are rendered in the form of a table of text labels and controls
- ["#X680 IPKVM Switch"] # Text starting with the sharp symbol will be a label
- [] # creates a horizontal separator and starts a new table
- ["#PC1-XXXXX:", button1] # Text label for PC1, one button with text "Click"
- ["#PC2-XXXXX:", button2] # Text label for PC2, one button with text "Click"
- ["#PC3-XXXXX:", button3] # Text label for PC3, one button with text "Click"
- ["#PC4-XXXXX:", button4] # Text label for PC4, one button with text "Click"
|
|
reads like this:
10. Save and exit by hitting CTRL + X, answering Y and hitting Enter when
prompted.
11. Restart the kvmd service
|
[root@pikvm
kvmd-webterm]#
systemctl restart kvmd |
|
12. Switching between hosts in the
UI
To switch between hosts, enter the KVM UI and click
the "Switches" menu. Click the buttons.
13. To disable write mode
|
[root@pikvm
kvmd-webterm]#
ro |
|
14. Reboot the system
|
[root@pikvm
kvmd-webterm]#
reboot |
|
|
| |
|
| |
|
About Mass Storage Emulation |
|
|
| |
|
| |
The X680 doesn't support PiKVM's Mass Storage Drive
because it already supports hotkey switching. The
integrated USB hub supports data sharing between 4
target hosts and can also be used for one of them,
which will be available even in BIOS/UEFI when you
need a live disk to revive the OS or even reinstall
it.
Step-by-Step Guide: Reinstalling the Operating
System Remotely
1. Insert a flash drive into a USB 2.0 port on your
X680.
2. Utilize one of the target hosts to create a
bootable USB stick using standard Microsoft tools,
such as the Media Creation Tool. Alternatively, you
can create a bootable USB stick from an ISO file
using other tools like Rufus.
3. Switch to the target host where the operating
system will be installed and proceed with the
regular installation procedure. |
| |
|
| |
|
CSI-2 bridge
connection test |
|
|
| |
|
| |
Make sure that the ‘/dev/video0’
device is available. Use this command to check:
|
[kvmd-webterm@pikvm
~]$ ls /dev/video0 |
|

If you see anything other than ‘file not found‘,
then it’s available.
|
| |
|
|
|
|
|
|
