|
|
|
|
| |
| |
PiKVM is
a Free and Open Source Software that is released
under the GPLv3 license. The Operating System (OS)
image provided here is solely for the purpose of
hardware testing. For commercial use, it is advised
to directly contact the developers of PiKVM.
The development of this software would not be
possible without the financial backing of the
community. Contributions play a vital role in
sustaining and advancing the project. If you wish to
contribute, you can visit the PiKVM donation page at
https://pikvm.org/donate/.
Your support is greatly appreciated and will help in
the continuous development and improvement of this
software.
|
|
| |

*Compatible with PiKVM V3
platform OS version only, not support V4 |
|
|
|
|
|
| |
| |
How to install Raspberry Pi Imager
Raspberry Pi Imager is free to
install from the official Raspberry Pi
website. It's available for MacOS, Windows,
and Ubuntu systems.
1. Visit the
Raspberry Pi download page.
2. Download the
Raspberry Pi Imager installer for your
Operating System.
3. Run the
installer and follow the prompts to complete
the setup.
Write a Raspberry Pi Imager built-in
image

1.
Launch Raspberry Pi Imager.
2. Click Choose OS.
3. Select Use custom to
write an unlisted image.
4. Click Choose SD card.
5. Select from the list the SD card you want
to write to.
6. Click Write to begin the
image writing process.
When the imager is
finished, you can connect your microSD card
to the Pi and boot it up.
Raspberry Pi Imager alternatives
If for whatever
reason you don't want to or are unable to
use Raspberry Pi Imager, you can opt to use
an alternative application. Here are a
couple we've relied on over the years
leading up to the new imager release.
-
balenaEtcher - The
application runs on Windows, MacOS, and
Ubuntu operating systems.
-
Win32 Disk Imager - This
imaging software is designed for Windows
machines.
|
|
|
| |
| |
Programming
the Compute Module |
|
|
| |
| |
To program the Compute
Module with eMMC, an
external “host” PC is connected to the USB
Type-C OTG port on the PCI card. After
entering eMMC programming mode and running
the “rpiboot”
utility, the Compute Module 4 will then
appear as a USB device to the “host” PC,
allowing it to be programmed.
|
|
| |
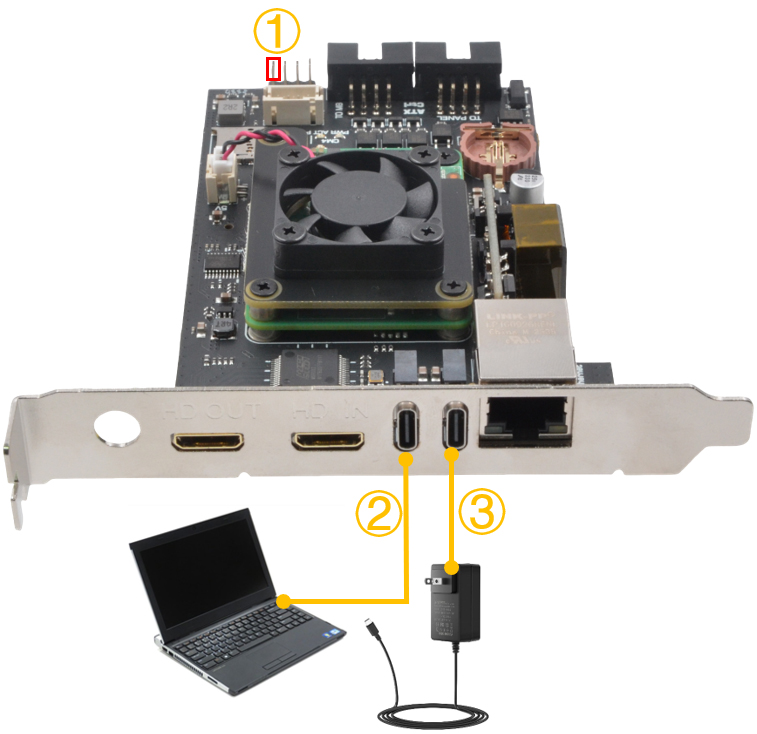
Host USB
Connection for Programming |
|
|
| |
| |
1 |
|
Fit a jumper to short
the pins of 'nBOOT' and 'Ground' to
enter eMMC programming mode.
|
|
2 |
|
Locat an USB port on
your PC/laptop and connect using a USB-C to
USB-A cable
|
|
| |
|
|
|
|
|
|
| |
3 |
|
Connect the USB Type-C
power supply (5V ≥3A)
|
|
4 |
|
Important:
Remove the jumper after programming is
complete. |
|
| |
| |
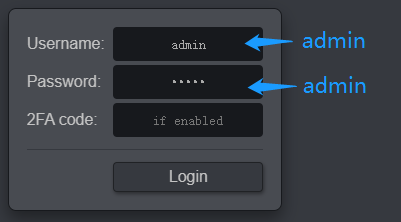
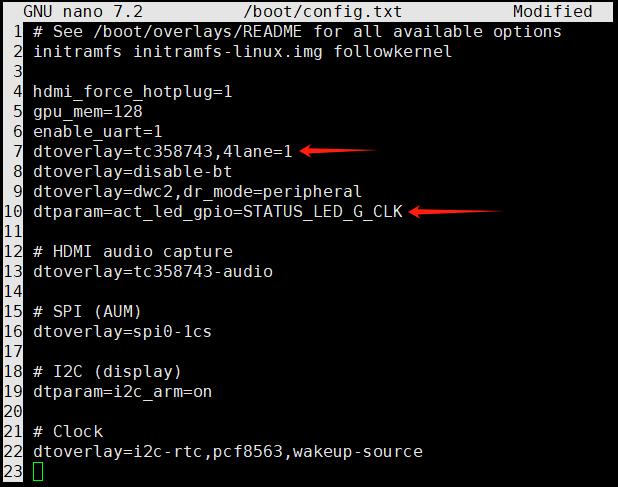
Configuring
the OS (Linux pikvm 6.12.56-1-rpi) |
|
|
| |
|
|
| |
|
|
|